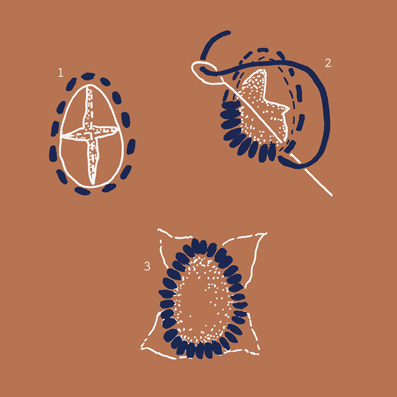
Bullion Stitch
Bullion Stitch

Interlaced hem stitch
Interlaced hem stitch
Drawn thread
Interlaced hem stitch
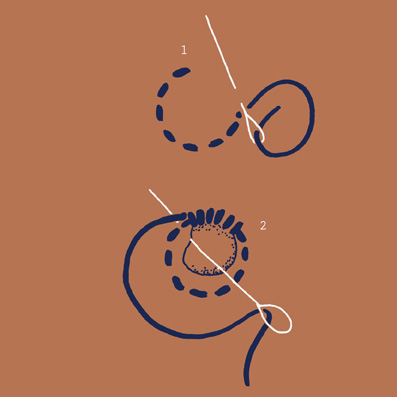
Start by pulling out a block of weft threads from a loose woven fabric. This stitch works from left to right.
1.Bring the needle up at point A and stitch around 4 of the pulled threads in an anti-
clockwise direction pulling the 4 threads together.
2. Bring the needle out at point B in preparation to stitch around the next set of 4 of the
pulled threads in an anti-clockwise direction pulling the 4 threads together.
3. The central long loose threads are then bound together with a simple tied stitch wound
around a set of 4 threads in a clockwise direction before moving on to the next set.
Hem Stitch
Hem Stitch
Drawn thread
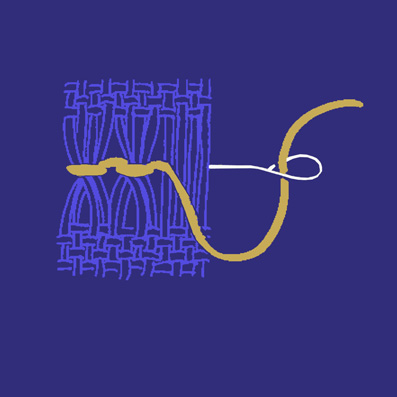
This technique involves carefully pulling out the weft threads in certain areas of the embroidery. The loose warp threads are then interwoven and twisted in regulated patterns for creative lacey effects. Very popular in accessories for the home in the 1940s and 1950s these techniques were highly influenced by Scandinavian design. A regular woven base cloth is essential in order to pull the threads out evenly.
Hem stitch
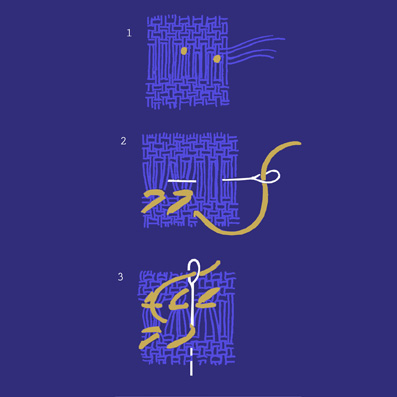
Start by pulling out a block of weft threads from a loose woven fabric. This stitch works from left to right.
1.Bring the needle up at point A and stitch around 4 of the pulled threads in an anti-
clockwise direction pulling the 4 threads together.
2. Bring the needle out at point B in preparation to stitch around the next set of 4 of the
pulled threads in an anti-clockwise direction pulling the 4 threads together.
Long Armed Feather
Long Armed Feather
Feather
Feather
Closed Feather
Closed Feather
Double Feather Stitch
Double Feather Stitch
Cretan stitch
Cretan stitch
Cretan stitch
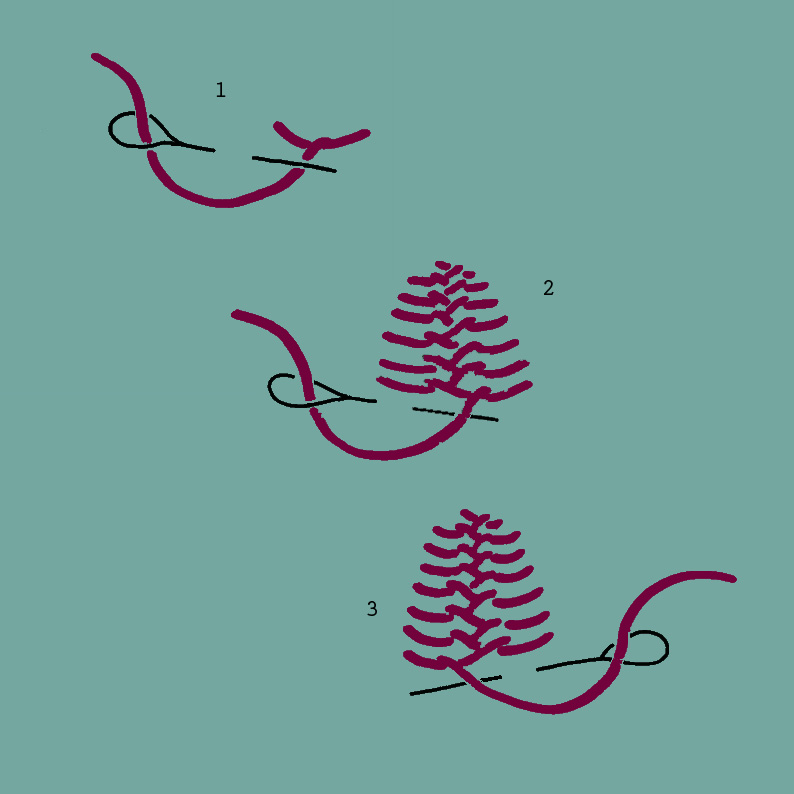
This can feel awkward to start with. Start by keeping the stitch larger and open before trying to create the stitches closer together. It is also useful to try to keep the angle of the stitch consistent.
1. Bring the needle out at A and take the needle down at B to the right and slightly below point A, bringing it back up half way between points A and B, ensuring that the thread is kept under the needle before pulling the needle right through.
2. It feels like working in reverse here. Bring the needle over to the left taking it in at point C and back out to the right of point C, at point D. Again, ensure that the thread is kept under the needle before pulling the needle right through.
Repeat steps 2 and 3.
Cut Eyelet Stitch
Cut Eyelet Stitch
Cut Eyelet.
This type of eyelet is created by cutting the base material to form a hole which is bound around with overcast stitching
1. Draw a shape on the base fabric .
2. Stitch a row of running stitches around the marked shape.
3. Pierce the centre of the circle with scissors and cut a cross shape towards the edges.
4. Now carefully push the excess material through the hole to the back of the work. The intention is that this will eventually be cut off.
4. Now stitch over the edges of the shape through the centre and over the line of running stitches to pushing the excess material to the back to form a hole in the material. The binding of the edges needs to be guided by base line of running stitch which is encased in the overcast stitch.
5. Completely overcast round the edge of the shape
5. Cut off any excess material from the back
Stiletto Eyelet Stitch
Stiletto Eyelet Stitch
Stiletto Eyelet.
This type of eyelet is created by piercing the base material to form a hole which is bound around with overcast stitching
1. Draw a small circle on the base fabric .
2. Stitch a row of running stitches around the marked circle.
3. Pierce the centre of the circle with a stiletto or knitting needle.
4. Now stitch over the edge of the circle through the centre and over the line of running stitches to pull the threads away to form a hole in the material. The binding of the edges needs to be guided by base line of running stitch which is encased in the overcast stitch.