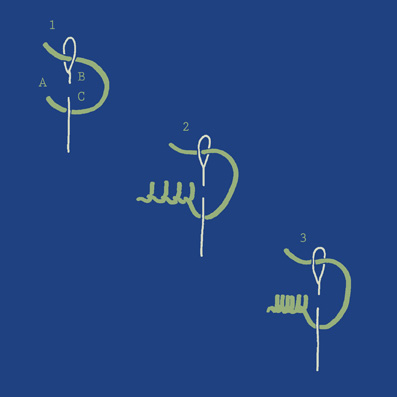
Detached Buttonhole
Detached Buttonhole
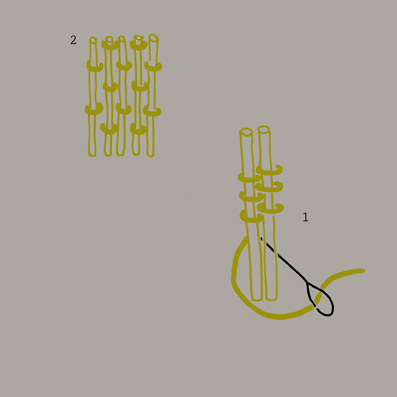
Detached buttonhole
This is created exactly the same way as buttonhole but rather than taking the stitching through the material the stitch is created around a bar and subsequently back into the previous line of stitching.
1. Bring the needle out at point A and create one long stitch (bar).
2. Bring the needle back up just below point A and begin to work buttonhole stitch around the bar itself as follows.
3. Holding the thread to the left carefully take the needle over the top and behind the bar. Before pulling the needle through carefully tuck the thread under the point of the needle, then pull gently to form the stitch. DO NOT take the needle through the material.
Repeat step 3
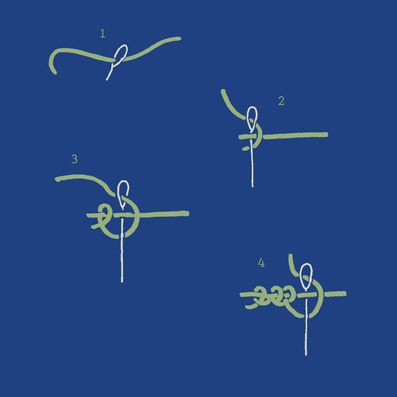
Buttonhole Stitch
Buttonhole Stitch
Buttonhole
Imagine making back to front capital L letters which are interlinked together. This will help ensure you start in the correct place.
1. Bring needle out at point A.
2. Take the needle back through at B and bring it back up at C without pulling it through the material.
3. Ensure the thread is tucked behind the needle before pulling the thread through.
4. Put the needle through at D bringing it back out at E, ensuring the thread is tucked behind the needle before pulling it through.
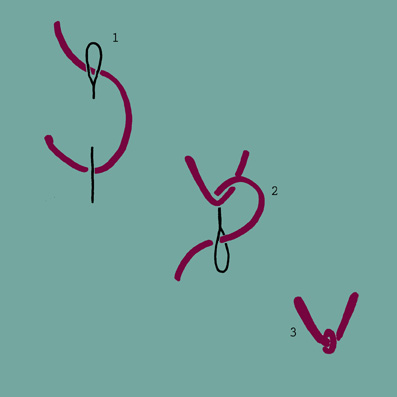
Fly Stitch
Fly Stitch
Fly
1. Bring needle out at point A.
2. Take the needle back through at B and bring it back up at C without pulling it through the material.
3. Ensure the thread is tucked behind the needle before pulling the thread through.
4. Make a tiny stitch to secure the loop.
Brick Couching
Brick Couching
Brick couching
This stitch works best with contrasting threads.
1. Stitch lengths of thicker thread in parallel lines to form a block on the base material.
2. Using a finer contrasting couching thread bring the needle up just below the thick thread.
3. Take a tiny stitch over the thick thread harnessing it to base material. The stitches need
to be created at regular intervals along one row of couching.
4. The following row of couching should be created directly below the centre of the
couching in the row above to create a brick like pattern.
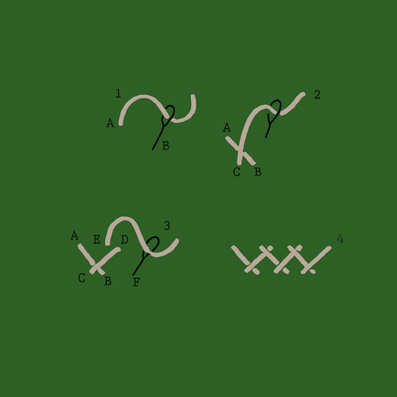
Zig Zag Stitch
Zig Zag Stitch
Tied Cross Stitch
Tied Cross Stitch
Star Stitch
Star Stitch
Interlaced Herring-bone
Interlaced Herring-bone
Interlaced herringbone
Firstly create a row of plain herringbone stitch ( steps 1-3)
1. Bring needle out at point A
2. Working down and back take the needle to the back through point B and out again at point C.
3. Crossing up and back bring the needle back again at D and out at E.
Repeat steps 2 and 3.
4. Having completed the row of herringbone, with a contrasting thread begin to weave around the crossed sections of the herringbone stitch from the bottom right point A under and round cross B, then woven under and round cross C , then under and round cross D.
Continue in this way.

Herring-bone Stitch
Herring-bone Stitch
Herringbone
1. Bring needle out at point A
2. Working down and back take the needle to the back through point B and out again at point C.
3. Crossing up and back bring the needle back again at D and out at E.
Repeat steps 2 and 3.